DIY: Easy Kid’s Sweater Scarf

IMG_2801 IMG_2803

This scarf was so easy to make and looks really cute on my son. I think it helps that he’s really cute too. 😉 He needed a new scarf and I wanted something easy to make that he could put on by himself. I got this idea from mingo & grace. It’s brilliant.

What you need:

  • a large sweater (thank you Value Village)
  • scissors
  • sewing machine or serger (optional)

What you do:

1. Cut across the sweater, just under the arm pits.

IMG_2790

2. Hem along the rough edge. Or even better, use a serger if you have one.

IMG_2791

3. Then wrap around it around your cutie’s neck. Done and done.

IMG_2798 IMG_2797

Look at his hand in his pocket. I think he thinks he’s in a Gap ad…LOL.

Baby Bandana Bib (It’s Reversible!)

IMG_1890 IMG_1896

My three month old daughter is starting to drool like one of those pups from Turner and Hooch. Ok, maybe it’s not that bad but I sense that hard core teething is just around the corner. I only had one of these cute bandana bibs lying around from when my son was a wee bobbin. It seemed like a feasible sewing project for an amateur so I gave it a shot and I’m really pleased with the way it turned out!

What to do:

1. You’ll need 2 pieces of fabric (approx 23″ x 9″). I made a pattern using the other bib. The measurements are in the picture below, in case you don’t have a bib to use. Those measurements take into account seam allowance. After you cut out your first piece, lay it right side down on the other piece in order to cut it out.

IMG_1879

2. The two pieces should be right side together ready for you to sew around the edges. Make sure you leave a gap at the end to pull the bib through so that it’s right side out.

IMG_1880

3. Iron the bib after you’ve made it right side out. Then sew up the gap (I folded the rough edges inward and pinned it – sorry I forgot to take a picture!) and then continue sewing around the edges in order to give it a finished look.

IMG_1881

4. Put it on the cutest baby ever.

IMG_1884

I think she likes it! 🙂

Easy, Delicious, Versatile Rice Dish

IMG_1697

I’m not really sure what this rice dish is called but I can tell you that it’s really tasty. This is a replica of the rice bowls at Circus Coffee House on the Danforth (near Woodbine – I highly recommend checking it out if you’re in the neighbourhood. It just happens to be next to Carter’s ice cream shop which works out nicely!). At Circus, the rice bowl is made with California short grain rice, shredded veggies with tofu and your choice of homemade deliciousness – aka hummus, baba ganoush or guacamole. How easy is that to replicate at home?

Ingredients (makes 3-4 large servings):

  • Rice (I used PC’s Blue Menu brown rice with barley and spelt because I couldn’t find California short grain rice)
  • 1 Carrot and 1 Beet, shredded
  • cherry tomatoes
  • I package firm or extra firm tofu (I’ve used roast chicken as well!)
  • teriyaki sauce for tofu
  • Choice of dip: hummus, baba ganoush or guacamole

Directions:

1. If using tofu, prepare tofu ahead of time by pressing and marinating in the teriyaki sauce. Check out directions on delish.com for how to cook tofu properly. This was VERY helpful!

2. Wash, peel and shred the carrot and beet.

IMG_1693

3. Boil rice as per directions on package.

4. Pan fry the tofu until brown and crispy.

IMG_1694

5. Scoop cooked rice into a large bowl or onto a plate. Top with shredded veg, cherry tomatoes, tofu and a generous portion of hummus (or other tasty dip).

IMG_1695

This dish is easy to make, easy to change up and healthy to boot. Enjoy!


Ikea Lack Hack

IMG_1336 IMG_1339

This is my transformed Ikea Lack coffee table. I was going for a rustic, reclaimed look, which I think I pulled off if you squint your eyes…LOL.

Actually, I’m really happy with the way this turned out. As with a lot of people out there, I own WAY too much Ikea furniture. It’s just so cheap and functional, especially when you have young kids. But I do get tired of the way it looks.

We recently moved to a new home so I wanted a new look without breaking the bank. Initially I thought I would make a whole new table from scratch but that started adding up so I decided to make over my Lack table. It’s nice to repurpose things too.

In order to get a rustic look I figured I could just stain and glue some wood right on top. I took to the internet to see if this had been done before and sure enough, it had (check out The Feminist Mystique’s tutorial). I also wanted the table to be low to work with our Kivik couch and on castors to make it easy to move out of the way for things like tummy time. 🙂

What you need:

  • Lack coffee table (the one we have measures 35 3/8″ X 21 5/8″)
  • 4 pieces of 2x6x3 pine (that’s 2 pieces of 2x6x6 cut in half. Home Depot will cut it for you)
  • 236ml can of Minwax Polyshades stain (I used the “Mission Oak” colour)
  • Foam brushes
  • Sandpaper (120 grit and 220 grit)
  • Adhesive (e.g., wood glue, construction grade glue)
  • 4 castors (1 1/2″)
  • circular saw

Before you start:

Make sure the 4 pieces are cut evenly. If the Home Depot worker does a sloppy job (happened to me), or you don’t want an overhang, you can cut the pieces to exactly 35 3/8″ to fit the length of the table.

What you do:

1. Sand the 4 pieces of pine (with 120 grit). Make sure you sand in the direction of the grain. I actually had my husband sand them with a hand sander.

2. Stain the pine. I just used a foam brush to apply the stain. The Polyshades are a good option because it’s stain and polyurethane in one step. You only need 2 coats. Lightly sand in between coats with a finer grit (220).

3. Before you glue the wood onto the table top, using a circular saw cut the legs off just under the metal pins that hold the shelf underneath the table.

IMG_1367

4. Screw the castors on.

5. Apply the glue to the table top and the underside of the pine, one piece at a time. Place them carefully on the table top. Place something heavy on top while the glue dries. We used boxes of books that we haven’t unpacked yet. You could also use clamps. Wait 24 hours.

I have to say this was a relatively easy, quick and cheap (approx $50 for everything) way to remodel my coffee table. And I love the way it looks and that I can roll it out of the way.

We went from this:

lack-coffee-table__57540_PE163122_S4

to this:

IMG_1335

Yay! 🙂


Easy 4 Ingredient Bird’s Nest Easter Treat

photo1 copy 2

Not only are these easy to make, with only four ingredients, they must be kind of healthy right? 😉

What you need (makes approx 15):

  • 3 Ripe bananas
  • 1 1/2 cup of oats
  • Shredded coconut
  • Mini eggs

What you do:

1. Preheat oven to 350 degrees.

2. Mash the bananas up in a medium sized bowl. You want a fairly smooth consistency but don’t worry about getting all the chunks out. Then add the oats.

3. Spoon the banana “batter” onto a greased or parchment lined baking tray. Then mold into little nest shapes. Don’t worry about spacing because they don’t spread or rise or anything like that.

4. Sprinkle some shredded coconut on top.

5. Place three mini eggs in the middle of the nest.

6. Pop them in the oven and bake for 15-20 minutes or until the nest/coconut starts to brown.

That’s it. You’re done! Enjoy your super cute, non-labour intensive Easter treats! 🙂photo2 copy


Easy Way to Dye and Decorate Easter Eggs

photo1

Seeing as I have a toddler, I was looking for an easy way to dye and decorate Easter eggs. Of course Martha Stewart has all the solutions.

Blowing out the eggs:

The best way to prepare the eggs if you want to keep them for next year is to blow them out. For this you need:

  • a pin
  • an aspirator

photo3

1. Poke a hole in the top and bottom of the egg. The holes don’t have to be that big but I did make a slightly bigger hole on the bottom. The aspirator works surprisingly well at blowing out the yolk. Just hold the aspirator up to the hole on the top and squeeze. Be careful to move the aspirator away from the hole afterwards because you don’t want to suck any yolk out of the top.

Dyeing the eggs:

What you need:

  • 1 cup warm water
  • 20 drops of food colouring
  • 1 tsp of vinegar
  • Mason jar or other jar with wide opening
  • Whisk

Using a jar and a whisk to dye the eggs is just plain brilliant. There’s virtually no mess and it’s fun for the kids to do.

1. Mix the water, vinegar and food colouring in the jar.

2. Place the egg inside the whisk

photo2

3. Lower the whisk into the jar and swirl around!

photo5 photo4

You can vary the intensity of the dye by leaving the egg in the mixture for longer.

Decorating the eggs:

If you want to add a little something something to the dyed egg here are two easy ways to do it.

1. Use crayons: with this method you must draw your designs on the egg BEFORE you put it in the dye. Use a lighter or contrasting colour.

photo1 copy

2. Marble eggs: with this method you add a bit of olive oil (1 tbsp) to a darker colour or contrasting dye and second coat your egg. This way was a little messier and the oil seems to take a long time to dry. I don’t know if I’d try this one again. But the effect is pretty cool.

photo1 marble copy

Happy Easter and happy decorating!!! 🙂


Cake Mix Blondies

2014-02-05 19.33.29

So…I don’t normally use cake mixes when I bake. But seeing as I haven’t baked in ages I figured I could cheat a little bit today. I found this recipe at Sally’s Baking Addiction via Pinterest of course. They were as easy to make as she promised, although hers turned out WAY prettier than mine did! I only made a couple of slight changes to the recipe.

What you need:

  • Yellow cake mix
  • 1/4 cup vegetable oil/canola oil
  • 1 egg
  • 1/3-1/2 cup of milk
  • 1/2 sprinkles
  • 3/4 cup chocolate chips (original recipe calls for white and 1/2 cup, I used milk chocolate)

2014-02-05 17.03.08

What to do:

1. Preheat oven to 350 degrees. In a mixing bowl, mix cake mix, oil, egg and milk.

2014-02-05 17.07.24 2014-02-05 17.13.56

2. Add chocolate chips and sprinkles. Oliver was actually shaking in anticipation when it came to the sprinkles. 🙂

2014-02-05 17.14.23 2014-02-05 17.15.30

3. Coat a baking dish and “pour” batter in. I put “pour” in quotations because mine was really thick and needed to be coaxed in. The original recipe said the less milk the better but maybe I should’ve added more. I used an 8″x8″ dish or you can use 7″x11″.

4. Bake for 25-30 min until edges are golden brown and then let them set for 30 min.

2014-02-05 17.53.57

I found that mine were still a little bit gooier in the middle than the ones from Sally’s Baking Addiction, even after letting them sit. However, I don’t consider this a bad thing. 😉

They are pretty tasty. I confess that I’ve never had a blondie before so I don’t have a basis of comparison. The great thing about this recipe is that it’s so quick and easy for the kids to help with. You could also try it with different mixes. Mmmm…I see red velvet cake mix in my near future…


DIY Animal Christmas Tree Ornaments

2013-12-14 16.21.41 2013-12-14 16.11.15

So I was in Target and I saw these really cute Christmas ornaments and I thought…hey I can make those! Here’s a picture of the ornaments that I copied from.

2013-11-04 16.22.12

To make these you’ll need:

  • wooden disc (I found these at DeSerres for $1. I think maybe they’re meant to be coasters)
  • acrylic paint ($2 at Dollar Store)
  • paint brushes
  • twine
  • glue gun
  • Sharpie (optional)
  • clear coat spray (optional)

What to do:

1. First draw an outline of the animal face lightly on the wooden disc in pencil.

2. Then start painting!

2013-12-14 14.20.31

3. After I finished painting I outlined the lines with a black Sharpie, which I think helped make the face stand out a little more.

4. Then use a glue gun to glue some twine on the back.

2013-12-14 16.17.55

5. Optional: You could seal it with a clear coat spray or maybe even glossy Modge Podge. I haven’t sealed these yet. I’m not sure if I want them to be glossy.

This would be a great craft for older kids to do. You can make the faces as simple or as detailed as you want and they don’t really require a lot of artistic talent.

Or…you could just buy the ornaments at Target for three bucks. LOL. Either way, they’re pretty cute on the tree!


DIY Pyjama Pants (Kid Size)

IMG_5264

Like many families, we have a little Christmas tradition of opening a new pair of pyjamas on Christmas Eve. This year I figured it would be fun to try and make them. I scored some Christmas flannel fabric at Fabricland for 50-75% off!

Because my sewing skills are limited, I searched long and hard for an easy to understand tutorial. I found that some take for granted that you know what you’re doing. 🙂 I came across an awesome tutorial for children’s sizes at Cotton Creations.

What you need:

  • fabric (how much depends on who you’re making them for. 2 metres should do for an adult. 3/4 of a metre was plenty for Oliver’s)
  • scissors
  • elastic waistband
  • sewing machine

What you do:

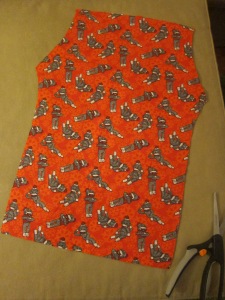
1. Lay out your fabric, right side up and fold the sides over until they meet in the middle.

IMG_5252

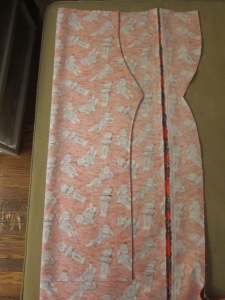
2. Fold a pair of pyjamas and place them with the straight side along the fold. Draw your pattern on the fabric leaving a couple of extra inches for the hem, seams, etc. (If you haven’t washed your fabric, keep shrinkage in mind too)

IMG_5254

3. Flip your cut out over onto the other side of the fabric. Again with the long side against the fold. Cut this side out too.

IMG_5255

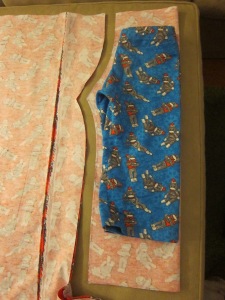
4. Now you’re left with two pieces that look like this (don’t you just love the sock monkey pattern!).

IMG_5256

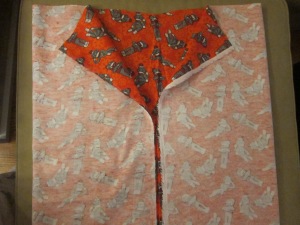
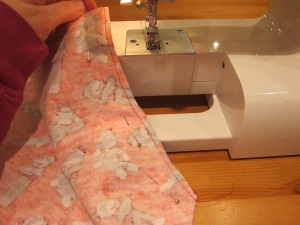
5. Put the two pieces, right side together and pin along the curves (this will be the crotch area) and sew only this part on both sides.

IMG_5259

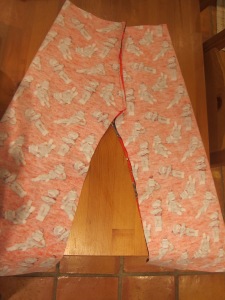
6. Then hold up your fabric and open up the waist so that the sewn edges are in the middle. This will make your fabric look more like a pair of pants. Now sew along the inseam, from one side all the way around to the other, closing off the crotch area.

IMG_5260

7. Now you’re ready to hem. Fold the bottom of the legs about a 3/4 of an inch. Press. Then fold again and press again. The lazy mom in me really wanted to skip the pressing part but it’s worth it to get the hem nice and even. After you’ve pressed it, sew along the top of the hem.

IMG_5261

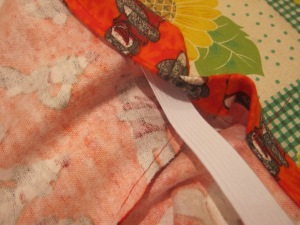
8. Repeat with the waist line. Fold and press, fold and press. Then sew around the waist, making sure you leave enough room to thread your elastic through. Don’t sew all the way around either.

IMG_5262

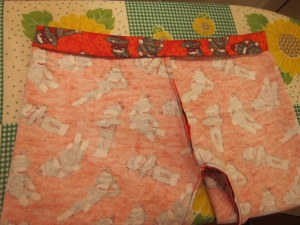
9. Put a safety pin on the end of the elastic and thread it through the waistband. You can put the elastic around your child’s waist first to see how much you need.

IMG_5263

10. Then sew the ends of the elastic together and close up the hole in the waistband. Turn the pyjama pants right side out and admire your amazing work! It really is satisfying to see how cute they turn out.

IMG_5245 IMG_5248

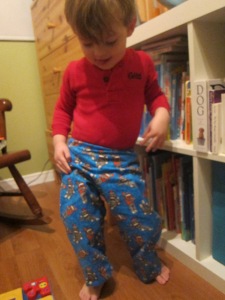
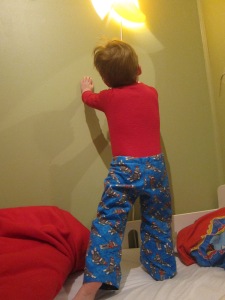
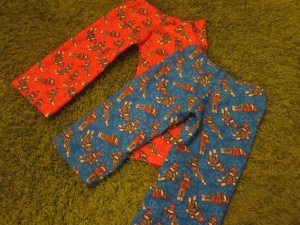
Oliver is quite happy with them. 🙂 Of course they were supposed to be for Christmas Eve but because this was my first time trying a project like this I got him to try them on quickly to make sure that they fit. Then I hid them in a cupboard and we went about our day. At bedtime though, Oliver kept saying “Monkey pants! Monkey pants!” and when I pretended like I didn’t know what he was talking about, he walked right over to the cupboard took them out and brought them to me. LOL. So I went back to Fabricland and got the red sock monkey fabric which he hasn’t seen yet. Shhhhhh…

DIY Duvet Cover for a Toddler Bed

IMG_5194 IMG_5195

Now that it’s getting colder, Oliver needs something more than his muslin blanket at night. I happened to find a Thomas the Tank Engine sheet set at a thrift store but it’s for a twin bed and Oliver is using just a little toddler bed. So I figured why turn it into a duvet cover? I found a tutorial from Martha Stewart which inspired this “lazy mom” version.

Here’s what you need:

  • 2 pieces of material large enough to cover your duvet (the duvet I used is 49″ x 43″. I used the Thomas sheet for one side and a fleece blanket for the other)
  • scissors and pins
  • a sewing machine

Here’s what you do:

1. Spread your sheet out on the floor and put the duvet on top.

IMG_5192

2. Cut the material to fit the duvet leaving approximately 2 inches on each side. I lined it up with two of the finished sides of the sheet so that I would only have to cut 2 sides. I used the grout lines on the kitchen floor to keep my cuts straight. Repeat with the other piece of material for the back of the duvet cover.

IMG_5193

3. Now pin the two pieces of material, inside out and sew along three edges.

4. I didn’t do anything fancy for the bottom. I just sewed across from the corners toward the middle, leaving about 6-8 inches open in order to turn the cover right side out and to leave a space to put the duvet inside. You could finish this off with buttons or snaps (the arrow below points to the opening).

IMG_5197 copy

So that’s it. This is definitely a lazy, easy way to make a duvet cover. But hey, it works! Oliver loves it of course. And I like that the fleecy backing will keep him warm at night. Now I just have to figure out what to do with the leftover Thomas material. Hmmm…I’m thinking Modge Podge…I’m thinking canvases… 🙂