Root Beer Pulled Pork

IMG_4709

I love pulled pork. But I always assumed it was one of those things that would take a lot of preparation or time to make. Not so, with a slow cooker and a can of root beer. 🙂

All you need for this is:

  • a can of root beer (355ml)
  • a bottle of BBQ sauce (approx 500ml)
  • 2 lbs of pork (tenderloin, shoulder, etc)
  • a slow cooker

What you do:

1. Put the pork in the slow cooker and pour the can of root beer over it. Cook it on low for approx 6 hours.

IMG_4705

2. After the pork is cooked, drain the root beer, pour on the BBQ sauce and pull the pork apart with a fork. Serve immediately or keep warm until ready to serve.

3. Serve the pork on a hamburger bun (I like the thin ones) or little slider buns.

You can add onions or whatever you fancy but honestly, it’s good just as it is. This dinner is great when you’re entertaining because it’s easy, cheap and tastes delicious. And it’s nice to have the slow cooker do all the work for you. 😉

Sharpie Anniversary Mug

IMG_4795 IMG_4796

Yesterday my husband and I celebrated our 3rd wedding anniversary. It was very low key…dinner and wine on the deck after Oliver went to bed. It was perfect.

Of course, I had to make him a little something. Unfortunately, I didn’t have a lot of time hence the Sharpie mug. This is my first time using a Sharpie and not a porcelain pen. I’m not sure how well the Sharpie will hold up as most people report that the Sharpie rubs off after a couple of washes. We shall see…

I decided to put a few key dates on the mug, like our first date, first kiss, etc. I saw something similar on Pinterest but framed. The sample in the link is clearly fake. It has the couple’s first date on April 22 and their first kiss on May 16. Who waits a whole month to kiss?! Anyways, I dug out a couple of old diaries to find some special dates. It was fun reading the entries from when we first started dating. I can’t believe that was almost 10 years ago!

I wanted the writing to circle the mug as if it was all one long string. On my first attempt (this took me two tries) I used masking tape to help me keep my writing straight. This was a bad idea. The tape left an invisible residue that turned brown when I baked the mug. Grrr. Maybe painter’s tape would be better? On my second try I just did it free hand and hoped for the best.

I also haven’t baked the one you see in the picture yet. Baking it really faded the colours. I figure we’ll just hand wash it and for $4 ($1 for the mug and $3 for the Sharpies) if it washes off, it’s not the end of the world.

If you make something similar try to avoid any surface that will come in contact with your mouth or the liquid. Sharpies aren’t exactly food safe. Also, the Sharpie wasn’t very forgiving. If you make a mistake, wipe it off immediately!

My husband thought it was really cute. He couldn’t believe that I had written down all those little milestones in my diary and that I was actually able to find the date for the first time that I told him I loved him.

Awww…I know what you’re thinking, gag me with a Sharpie. 🙂

IMG_4797

DIY Letter Art

IMG_4717 3

So, I poached this idea from a friend of mine.  She did her last name out of architectural features, had it framed and gave it to her husband for an engagement present. It’s absolutely beautiful. What makes it even more special is that she took all the pictures herself, from buildings or structures that have personal meaning to them.

I wanted to do something similar for Oliver. But because he has an enormous affection for trains (one might almost call it an obsession) and hasn’t exactly created any attachments to architecture, I decided to go with a train theme.

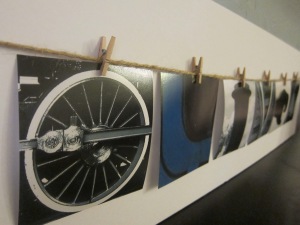
Unfortunately, it wasn’t really feasible for me to take the pictures myself so I had to scour Google images trying to find train parts, or things related to trains that look like letters in his name. The “O”, “I” and “V” were easy. I had to stretch my imagination a little bit for the other letters. In case you can’t tell what they are the “O” is a train wheel (from an old steam train, like Thomas, of course), the “L” is the corner of a train window, the “I” is a funnel from a steam train, the “V” is a section of tracks, the “e” is a coupling and the “r” is part of a train bridge.

Oliver recognized that most of the letters were train related, which was very satisfying. 🙂

To make your own you’ll need:

  • photos of letters in your name from objects, buildings, etc. (see below for more details)
  • foam board
  • twine
  • mini clothes pins

IMG_4725

Here’s what you need to do…

Find the letters you need:

You can do this either by taking the pictures yourself or finding images on Google. If you can take them yourself then you’ll have more control over the quality. It took me a long time to find the right pictures, at the right angle and size. Check out Alphabetical Architecture for ideas. Or just choose a theme and see what you can find. 🙂

Create Uniformity:

Once you have your images, make them a similar colour. This helps make the name more legible. Sepia or black and white look great. I used the blue tint in Photoshop Elements to compliment the blue window frame of the “L”. I think you  can add colour tints in iPhoto as well.

Printing:

Printing them out can be an issue because not all letters are suited to one orientation (portrait or landscape). I wanted my letters to be the same shape and size so I chose to print them as 4X4s. Black’s offers this size now, meant for Instagram photos.

Mounting or Framing:

Depending on how manly letters are in your name or how you choose to print your photos, you’d most likely have to get it professionally framed, as my friend did. Framing looks brilliant but it’s costly. For this project I decided to tape some twine to foam board and use mini clothes pins to hold the pictures in place. I figure this look suits a kid’s room or playroom. For a different look, you could modge podge it onto the foam board. See a similar example here. This would be more durable and I may end up doing that in the future with Oliver’s train name.

IMG_4720

I’m really pleased with how it turned out. And Oliver loves it, which is the main thing. For a two year old that adores trains, it doesn’t get much better than this. 😉

Grilled Peaches with Frozen Yogurt

IMG_4712

August is a month for enjoying peaches. Farmer’s markets are teeming with them. So when I found out that my in-laws were coming over for dinner, I couldn’t resist buying some for dessert.

What you need:

  • ripe peaches
  • brown sugar
  • frozen yogurt of choice

What you do:

1. Preheat the grill. Pit the peaches and cut them into quarters.

2. Coat the peaches in brown sugar.

3. Put the peaches on the BBQ and grill to your liking.

IMG_4711

4. Serve with frozen yogurt or ice cream. A plate of crunchy oatmeal cookies doesn’t hurt either. 🙂

I loved the way this turned out.  I used Chapman’s Caramel Pecan Crunch frozen yogurt. The flavour combinations were delicious. However, I have also paired the peaches with vanilla ice cream and drizzled it with ice wine, which was amazing. Obviously.


Frozen Yogurt Berries

IMG_4701

This is healthy, sweet little treat for a hot day. Dip some berries/fruit into some yogurt and put them in the freezer. Wait an hour. Done.

What you need:

  • Greek yogurt
  • berries/fruit
  • toothpick or spoon
  • dish to freeze them on

IMG_4696

What you do:

1. Dip the berries into the yogurt using a toothpick, spoon, or just use your hands. I used lime flavoured Greek yogurt. Yum.

IMG_4699

2. Spread them out on a dish and put them in the freezer for an hour. After an hour the yogurt is frozen but you can still bite into the berries. If you leave them any longer, you’ll have to give them time to thaw.

IMG_4702

It was a nice and easy way to change up the way we eat fruit. And yogurt. And fruit in yogurt. If you don’t eat them all in one go, put them into an airtight container and pop them back into the freezer for later.